Today is the day I have been waiting for forEVER. I am so excited to share a little something that I dreamed up and Taylor from Taylored Expressions helped me turn it into a reality!!! Today we are introducing Masking Stencils! What is a masking stencil you ask? Well, let me show you! (I have lots to share so hang with me!)
I have 2 projects to share today along with a video showing a little about how to use them. First up, a couple of videos.....
_____________________________________
MASKING STENCILS
One of my favorite techniques is masking around the front of a card and adding in ink blending. The problem with masking is that sometimes the masking tape decides to hold on to your card stock and rip your creation. That has happened to me several times. I knew there had to be something easier so this masking stencil idea just came to me! I drew it out with a Sharpie and called my friend Jill Hawkins and asked her what she thought. She told me she needed it yesterday! :) So I assumed I was on to something.
Next, I called my friend Heather Nichols and she drew it up for me exactly like I pictured. And then I called Taylor and the masking stencils were born!
Talk about an exciting day when they came in the mail. I wanted to mask every card I made at that point. They worked beautifully. Here is the first blending project I did with the large rectangle masking stencil layered with Taylored Expression's Mosaic Leaves Stencil....

Here are the 4 sets of Masking Stencils that we have created. There are 4 shapes, 2 of each which are all pictures below. The stencils are $14 for the set of 2 and $48 for the full set.
The Masking Stencils will have lots of uses for mixing techniques but here are a few benefits....
1. No more masking with washi tape hoping your lines are straight and your paper doesn’t rip when you remove it. Simply use Pixie Spray or purple tape to adhere the stencil to the back of your cardstock panel - no more ripping!
2. There are two lines etched into each stencil for perfect alignment of an A2 card base or the layer just inside an A2 size (4” x 5.25”). Takes the guesswork out of centering the mask!
3. The stencil mask also includes the solid shape that falls out from the middle allowing you to reverse mask or apply two tones of ink to the project.
Masking Stencils - Circle


_____________________________________
CARDS
Here are the projects I made using the Masking Stencil layered with one of Taylored Expressions Stencils.

First up, the Oval. I attached the card to Oval Masking Stencil and then layered the Blooming Beautiful Stencil on top. I was able to use the amazing Taylored Expression Brushes to add little bits of colors onto the flowers. When I removed both stencils, this perfect Oval shaped background was revealed.
I add the hello die in silver glitter paper, shadowed with vellum and then finished it off with a Simple Strips - Friendship sentiment and die cut. If you haven't had a chance to see Taylored's Simple Strips, click HERE. Amazing!!

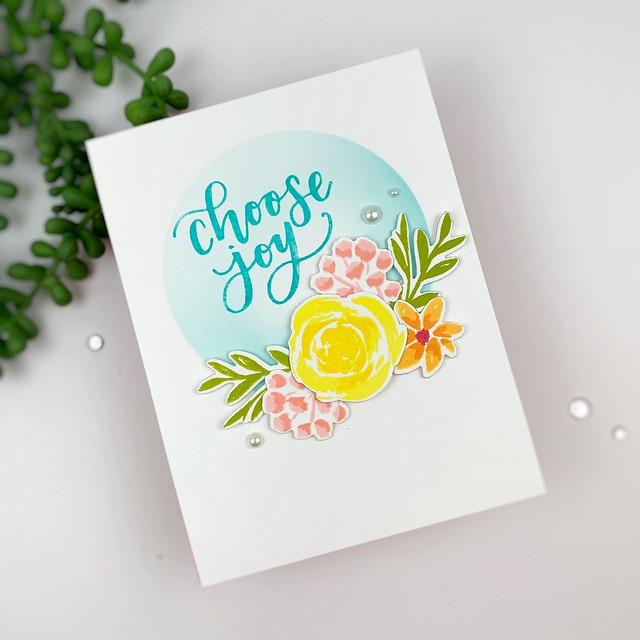
Check out the Masking Stencil - Circle.....

The stencils do all the work for you. They center your masked of area instantly. The tape or adhesive all goes on the back of your card front so the part of your card front that you want clean, is completely protected. All of this can be done so quickly!
After using the masking stencil, I added in some Fresh Picked Florals to the card front. Taylored Expressions has a set called Handlettered Sentiments.....you don't want to miss this one....and I used it to add in the Choose Joy.
Click HERE to check out how to purchase all 4 Masking Stencil sets in ONE BUNDLE.
_____________________________________
LIMITED TIME PROMOTION
For a limited time, if you purchase the Bundle of all 4 shapes, you get a free 1/2" Purple Masking Tape.....

_____________________________________
MASKING STENCIL INSPIRATION
Check out more Masking Stencil inspiration by stopping by these blogs....
I am so glad you joined me today. Thank you for sharing in my excitement! I hope you love these masking stencils as much as I do! Head on over to the Taylored Expressions blog to see all the new stencils along with more design team inspiration and all the details!
I want to send a HUGE thank you to Heather for helping me along the way! And to Taylor for making this fun little idea turn into a reality! So blessed to count you both as friends!
Hope you have a great day!

_____________________________________
FIND ME OVER ON:
Instagram: Laurie Willison (@laurie_willison)
YouTube: Soapbox Creations
Facebook: Soapbox Creations
All products in today's post are linked below and throughout the post. These are my personal affiliate links which you can shop from at no cost to you! :) Thank you for supporting Soapbox Creations!


Girl - these are pure GENIUS! Your cards are beautiful. i can't wait to get these stencils - truly a game changer!
ReplyDeleteBrilliant, Laurie!!!! And the alignment guide makes me love it even 10x more.
ReplyDeleteThese are brilliant! Ordered and can’t wait to try them, congrats on a great idea brought to market!
ReplyDeleteCongratulations! Such a brilliant idea and I’m so glad you had the courage to pursue it. You rock!
ReplyDeleteLaurie, congratulations on seeing the fruit of your dreams. You can hold it, smell it, kiss it and make all sorts of pretty things. YEAH YOU!
ReplyDeleteI am absolutely thrilled for you! This is a must have product (I've already ordered mine). I can hardly wait to use it.
ReplyDeleteCongratulations!!!!
Sold! I broke my spending freeze vow because of you, just so ya know ;) It's a great concept and one that I've been wanting for a long time without even realizing it. No more cutting my own out of acetate - Yay! Congratulations on making your vision a reality.
ReplyDeleteYour cards are so pretty, Laurie! I'm so glad you collaborated with Taylor to bring this concept to the paper crafting community...Thank you!
ReplyDelete