10/22/26

The Greetery | Evergreen Collective Release Day!


Happy Wednesday, friends!

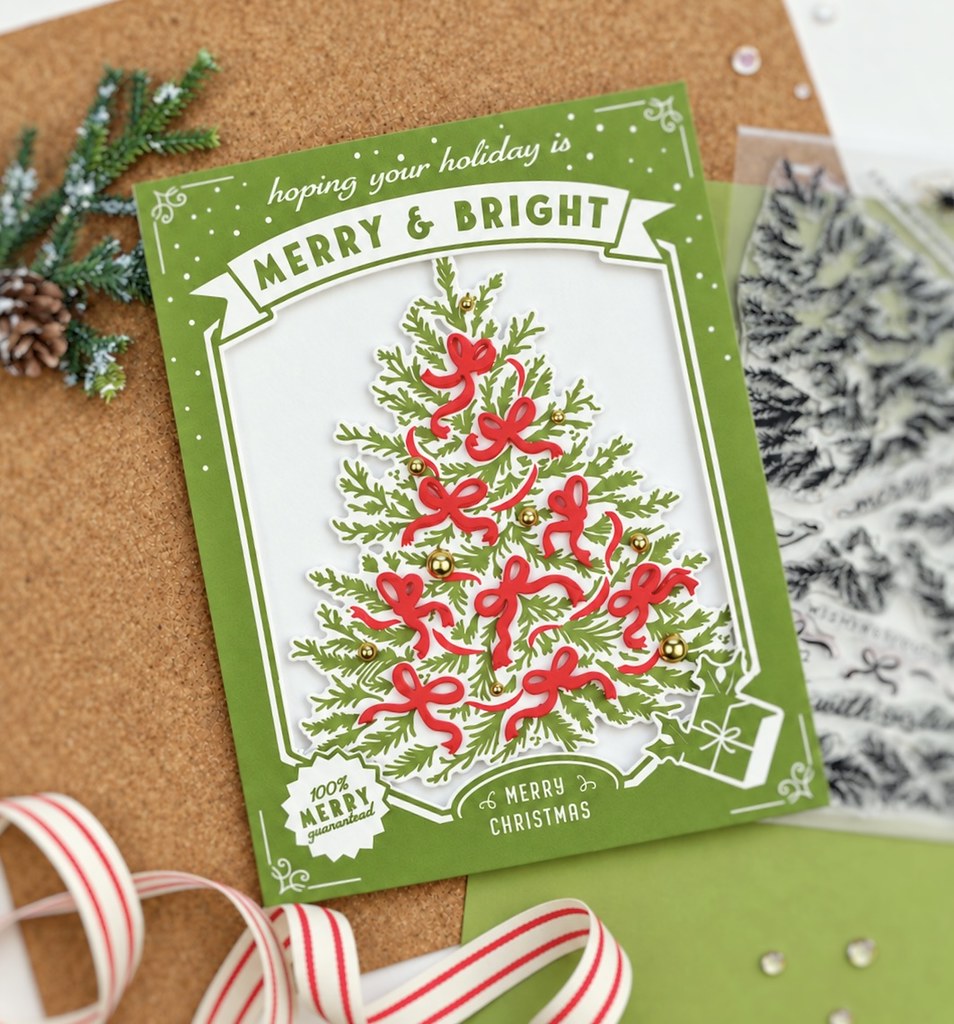
 It's time for another fun week at The Greetery's District Twelve25 Holiday Shop Hop, and this week's collection is all about the beautiful Evergreen Collective and will be available today, October 21st at 10am eastern!

I have loved sharing a little holiday inspiration with you this week! There is just something about Christmas greenery that makes my heart happy. From beautiful evergreens and festive details to all those little touches that make handmade cards so special, this collection is filled with so many possibilities!  I also used the Ornament Box Top Vertical Rubber Stamp to create today's card along with the Bow-Tique Holday Stamp Set and coordinating die. 

The Greetery - Evergreen Collective

One of my favorite things about The Greetery is how beautifully the products work together. I love mixing and matching different elements, adding layers and dimension, and watching a card come together. The Evergreen Collective is perfect for creating those classic Christmas designs that never go out of style!

As we wrap up another week of inspiration, I hope you've found a few ideas to tuck away for your own holiday cardmaking. Whether you're getting a head start on Christmas cards or simply adding a few new goodies to your crafty collection, there is so much to love!

Ready to shop?

You can find this week's Evergreen Collective goodies as part of The Greetery's Holiday 2026 Collection!

🎄 SHOP THE GREETERY HOLIDAY 2026 COLLECTION HERE!

Thank you so much for stopping by this week and for all your sweet comments and encouragement! It's always such a joy sharing these projects with you.

Be sure to keep following along because there's even more holiday inspiration coming as we continue our journey through District Twelve25!

Happy crafting, friends! ❤️🌲


10/21/26

The Greetery - District Twelve15 Shop Hop Week 2


I'm so excited to share two festive Christmas cards featuring some beautiful products from The Greetery! I went with a traditional holiday color palette of bright reds, fresh greens, and touches of gold. Both cards have lots of dimension and detail, but each has its own unique look! Everything you see today will be available for purchase, Thursday, Ocotber 22nd at 10am EDT over at The Greetery!

__________________________________

Merry Christmas with Bow-tique Holiday


For my first card, I started with the A2 Arches Die to create a window in a bright red cardstock panel. I love how the arch frames the Christmas greenery and gives the card such a clean, classic look!


The Greetery - District Twelve 25 Week 2


For the focal point, I used the Bow-tique Holiday Stamp Set and coordinating Die to create a beautiful Christmas tree filled with lush green branches, little red bows, and gold ornaments. I love all the tiny details in this set! The red bows really pop against the greenery, while the gold accents add just the right amount of holiday sparkle.

I finished the card with the coordinating Merry Christmas sentiment, following the curve of the arch. I love how it ties everything together and creates such a festive little scene!


__________________________________

Christmas Greenery with Brimming Baskets

For my second card, I wanted to create something full of beautiful holiday greenery with a little bit of elegance!

I started with a cream linen cardstock panel and used the Cathedral Die to create the pretty architectural detail in the background. I love the subtle interest it adds without taking away from the arrangement.

Next, I used the Brimming Baskets Die and Embossing Folder to create my basket. The embossed texture adds so much realistic detail and gives the basket a beautiful woven appearance!

The Greetery - District Twelve 25 Week 2

Then came the fun part—filling it with greenery! I used the Berry Bouquet Builder Die to create layers of leafy branches and bright red berries. I mixed several shades of green cardstock to give the arrangement extra depth and a more natural look. I tucked the different branches together, allowing some of the greenery and berries to spill over the edges of the basket.

To finish things off, I added a gorgeous gold bow, from the Fit to be Tied Die, to the center of the arrangement. I love how the metallic gold catches the light and adds a little elegance! The tiny Merry Christmas tag was created with the Teeny Tags Holiday Stamp Set and Teeny Tags Die and tucked right into the bow.


Thanks so much for stopping by today! I hope these projects inspire you to for some Christmas card making!  Shop the full releases on the 22nd by clicking HERE!

__________________________________

SUPPLY LIST

Card One:


Card Two:

__________________________________


GIVEAWAY

The Greetery is generously giving away TWO Evergreen Collective Bundles! For your chance to win, simply leave a comment on this blog and all the blogs in the list below! Be sure to get your comments in by Wednesday night, 10/21 at 11:59 pm EDT. 


Good luck, friends!


A little info about commenting here on my blog....


A quick note about comments! My comments are moderated because, unfortunately, I get a TON of spam—the kind telling me about cholesterol medication and all sorts of other weird bot things. 😂 So, if you leave a comment and don’t see it right away, don’t worry! I’ll see it and get it posted for you.

The other issue seems to be whether or not you need a Google account to comment. I have my settings set to “Anyone,” so technically you should be able to leave a comment using any type of login…but Blogger is a pain.

If you’re having trouble leaving a comment, or you’re not sure whether your name is showing up with your comment, please do me one little favor:

Add your name and email address to the end of your comment.

That way, if your comment is chosen as a winner, we’ll know exactly who you are and how to reach you!

I’m sorry for the extra hassle. I’ve Googled, changed settings, switched things around, and tried all the things. I have no idea why it doesn’t work the way it should.

But, again…

Blogger is a pain. 😂

 __________________________________


FIND ME OVER ON:


Instagram: Laurie Willison (@laurie_willison)


All products in today's post are linked below and throughout the post.  These are my personal affiliate links which you can shop from at no cost to you!  :)  Thank you for supporting Soapbox Creations!

10/18/26

Concord & 9th | Sending Hugs with Floral Embrace

Hello, crafty friends! I'm back today with another card created with some beautiful products from Concord & 9th! Today's project is all about pretty florals, gorgeous cardstock colors, and one big HUG! I absolutely love the oversized lettering in the Floral Embrace Dies and how all those sweet little flowers and leaves can be tucked around the letters to create such a beautiful focal point.

I started with a soft gray card base and used the Essential Labels & Frames Dies to add that pretty stitched border around the outside. I love the subtle detail it adds to the background without taking away from the main design!

Next, I die cut the large HUGS letters using Rainforest Cardstock. This deep green is one of my favorite Concord & 9th colors, and it really makes those oversized letters stand out!

Concord and 9th October 2026 Release

For all the pretty floral details, I pulled out several of my favorite cardstock colors. I used Avocado Cardstock for the leaves and greenery, along with Sorbet Cardstock, Sea Glass Cardstock, Honeysuckle Cardstock, and Ballet Slipper Cardstock to create the different flowers and little accents.

I love how all these colors work together! The softer pinks paired with the Sea Glass and Avocado greenery give the card such a fresh, cheerful look. I arranged the die-cut flowers and leaves around the large HUGS letters, tucking some behind the lettering and layering others on top to create lots of dimension.

For the sentiment, I kept things simple and used just one ink color! I stamped "Missing You" onto a little white die-cut banner using Rainforest Ink. I placed the banner across the center of the card, letting the big HUGS letters do most of the talking!

One of my favorite things about this card is that almost everything is created with cardstock and dies. No complicated coloring needed! Just a handful of pretty colors, some layering, and a little creativity.

I think this would be such a sweet card to send to someone who needs a little extra love or encouragement. After all, who doesn't love getting a hug in the mail?

Thanks so much for stopping by today! I hope this inspires you to pull out your favorite Concord & 9th cardstock colors and have some fun creating!


Concord & 9th Supplies

Dies

Floral Embrace Dies – HUGS

Essential Labels & Frames Dies

Cardstock

Rainforest Cardstock

Avocado Cardstock

Sorbet Cardstock

Sea Glass Cardstock

Honeysuckle Cardstock

Ballet Slipper Cardstock

Ink

Rainforest Ink Pad

Shop Concord & 9th

Shop All Concord & 9th Products

Affiliate disclosure: This post contains affiliate links. I may earn a small commission from qualifying purchases at no additional cost to you. Thank you for supporting my creative work!

10/17/26

Concord & 9th | Bloom & Grow

Hello, friends! I'm back today sharing another fun card created with the beautiful Bloom & Grow Bundle from Concord & 9th! I absolutely love the sweet floral details in this collection, and of course, the butterfly is such a pretty finishing touch!

For today's card, I chose a fresh and cheerful color combination of White, Pink Lemonade, Avocado, and Honeysuckle cardstock. These colors look so pretty together, especially with the bright pops of color from the stamped flowers!

Concord and 9th October 2026 Release

I used the Bloom & Grow Stamp Set and coordinating Bloom & Grow Dies to create the floral elements, bringing everything to life with Poppy, Avocado, and Sorbet inks. I love how these colors complement one another and give the flowers such a happy, springtime feel!

One of my favorite little details is the butterfly! I added a vellum die cut behind it to give the wings a soft, delicate look. That extra layer adds just the right amount of dimension without making the butterfly feel too heavy. I also added clear dew drops to the  center for a little shine and texture. Sometimes it's those tiny finishing touches that make a card feel extra special!

I love mixing stamped images with die-cut cardstock pieces, and this collection makes it so easy to create beautiful layered designs. The combination of bright florals, soft vellum, and those little sparkling dew drops makes this such a sweet card!

Thanks so much for stopping by today! I hope this inspires you to pull out your favorite floral stamps and have a little fun mixing colors and textures!


Concord & 9th Supplies

Stamps & Dies

Bloom & Grow Stamp Set

Bloom & Grow Dies

Bloom & Grow Bundle

Cardstock

White Cardstock

Pink Lemonade Cardstock

Avocado Cardstock

Honeysuckle Cardstock

Ink Colors

Poppy Ink Pad

Avocado Ink Pad

Sorbet Ink Pad


Shop Concord & 9th

Shop All Concord & 9th Products

Affiliate disclosure: This post contains affiliate links. I may earn a small commission from qualifying purchases at no additional cost to you. Thank you for supporting my creative work!

10/16/26

Concord & 9th | Finch Friends & Essential Labels and Frames

Hello, friends! I'm back today with another fun card as a guest designer for Concord & 9th! For today's project, I combined the adorable Finch Friends collection with the Essential Labels & Frames Dies to create this sweet little thank-you card. I just love that cute bird perched on the branch surrounded by those cheerful yellow flowers!

I started with a Sorbet cardstock card base and used the Essential Labels & Frames Dies to create the pretty white focal panel. I love the unique shape of this frame and the delicate stitched details around the edges! The coordinating decorative details on the Sorbet background add just the right amount of interest without taking away from the stamped images.


Concord and 9th October 2026 Release

Next, I pulled out the Finch Friends stamps and used a combination of Rainforest, Avocado, Buttercup, and Sorbet inks to bring my little scene to life. Rainforest was perfect for the bird and sentiment, while Sorbet added those sweet little details to the bird's chest. I used Avocado for the leafy branch and Buttercup for the bright yellow flowers. I love how these colors work together against the soft Sorbet background!

I added the flowers with a little dimension to make them pop off the card, then finished everything off with the "Thanks for everything" sentiment stamped along the bottom of the white panel.

This is such a simple card, but all those little details make it feel extra special! I especially love how the Essential Labels & Frames Dies pair with the Finch Friends images. It's always fun to mix and match different products to create something new!

Thanks so much for stopping by today! I hope this inspires you to pull out a few favorite ink colors and create something cheerful!


Concord & 9th Supplies

Stamps & Dies

Finch Friends Stamp Set

Finch Friends Dies

Finch Friends Bundle

Essential Labels & Frames Dies

Ink Colors

Rainforest Ink Pad

Avocado Ink Pad

Buttercup Ink Pad

Sorbet Ink Pad

Cardstock

Sorbet Cardstock

White Cardstock

Shop Concord & 9th

Shop All Concord & 9th Products

Affiliate disclosure: This post contains affiliate links. I may earn a small commission from qualifying purchases at no additional cost to you. Thank you for supporting my creative work!


10/15/26

Concord & 9th | Woven Words – You're Pretty Special!

Hello, friends! I'm back today sharing another fun project as a guest designer for Concord & 9th! Today's card features the beautiful Woven Words Stamp Set and coordinating Woven Words Dies. I just love all the intricate woven details and pretty decorative elements in this collection!

For this card, I chose a soft and pretty color combination of White, Pink Lemonade, Sorbet, and Rainforest cardstock. I love how the lighter pink shades pair with the rich Rainforest green! I started by creating a clean white card base with a subtle lined background, which adds just a little texture while keeping the focus on the layered elements.

Concord and 9th October 2026 Release

Next, I used the coordinating dies to cut several of the beautiful woven circles and decorative pieces. I mixed Pink Lemonade and Sorbet cardstock for the soft pink layers, then added Rainforest cardstock for contrast. I especially love how the intricate circular designs look when layered together! The different shapes and colors add so much interest and dimension without making the card feel too busy.

For the sentiment, I stamped "You're Pretty Special" in Rainforest ink onto white cardstock and framed it with one of the decorative die cuts. I tucked a few little Sorbet banner pieces behind the sentiment to bring in another touch of pink and tie everything together.

I love how this card turned out! The Woven Words collection has such a fun mix of textures and patterns, and it's perfect for creating cards that look detailed but are really quite simple to put together. Sometimes all you need is a few pretty cardstock colors and some creative layering!

Thanks so much for stopping by today! I hope this inspires you to pull out your favorite cardstock colors and have a little fun creating something special!


Concord & 9th Supplies

Stamps & Dies

Woven Words Stamp Set

Woven Words Dies

Woven Words Bundle

Ink Colors

Rainforest Ink Pad

Cardstock

White Cardstock

Pink Lemonade Cardstock

Sorbet Cardstock

Rainforest Cardstock

Shop Concord & 9th

Shop All Concord & 9th Products

Affiliate disclosure: This post contains affiliate links. I may earn a small commission if you purchase through these links, at no additional cost to you. Thank you for supporting my creative work!

District Twelve25 Shop Hop Week 1 – Noel Needleworks


Happy Release Day, friends!

Today's the day! The first stop on The Greetery's District Twelve25 Holiday Shop Hop is officially here, and we're kicking things off with the sweetest collection of quilt-inspired goodies from the Noel Needleworks shop!

If you love all things cozy, handmade, and full of charming little details, you're going to love this release! From beautiful quilt patterns and embossed textures to coordinating stamps, stencils, and dies, there are so many fun possibilities with these new products.


One of my favorite things about this collection is how beautifully everything works together! The Capsule Quilt Shop Stencil makes it easy to add gorgeous color and patterns, while the Capsule Quilt Shop Embossing Folder adds that beautiful quilted texture. Pair them with the Capsule Quilt Shop Die, Capsule Quilt Shop Background Stamp, and Capsule Quilt Shop Elements Stamp Set, and you have so many options for creating your own unique designs!

I'm also loving the Quilt Block Builder Stamp Set and the Shortbread Shapes Rectangle Quilt Blocks Embossing Folder. These are such fun additions for creating sweet little quilt blocks, and I love that they can be used for so much more than just Christmas cards!


The new release goes live TODAY, Thursday, October 15, at 10 AM Eastern Time (9 AM Central)!


You can shop all the new goodies right here:

SHOP THE HOLIDAY 2026 COLLECTION

New Release Supply List

Capsule Quilt Shop Embossing Folder

Capsule Quilt Shop Stencil

Capsule Quilt Shop Die

Capsule Quilt Shop Elements Stamp Set

Capsule Quilt Shop Background Stamp

Quilt Block Builder Stamp Set

Shortbread Shapes Rectangle Quilt Blocks Embossing Folder


Thanks so much for stopping by today and sharing in the excitement of this fun new release! I can't wait to see all the beautiful things you create with these new goodies!

Happy shopping and happy crafting!

10/14/26

Concord and 9th Guest {Park Bench}


 Hello, friends! I'm back today sharing another project as a guest designer for Concord & 9th! This time I'm featuring the adorable Park Bench Stamp Set and coordinating Park Bench Stencil Pack. I just love this sweet little park scene, complete with a bicycle, bench, and beautiful tree!

I started by stamping the entire scene in black ink onto white cardstock. I love how all those fine black details really make the images pop! Once everything was stamped, I used the coordinating stencils to bring the scene to life with color. These stencils make it so easy to add color to all the different elements without having to do a lot of detailed coloring.

Concord and 9th October 2026 Release

I chose a variety of fresh greens for the tree and shrubs, warm browns for the tree trunk and park bench, and a soft blue for the sky. I also added a little pop of red to the bicycle, which I think is such a fun detail! I love how the colors blend together while still allowing those crisp black stamped outlines to shine through.

To finish things off, I added the simple "missing you" sentiment right in the center of the scene. I love how it fits perfectly between the tree and lamppost! I mounted my finished panel onto a white card base, keeping everything clean and simple so the stamped scene could be the star of the show.

This was such a fun card to create, and I love how the coordinating stencils make coloring a detailed scene so quick and easy! Thanks so much for stopping by today!

__________________________________

Concord & 9th Supplies

Stamps & Stencils

Park Bench Stamp Set

Park Bench Stencil Pack

Park Bench Bundle

Ink Colors

Avocado Ink Pad

Poppy Ink Pad

Pistachio Ink Pad

Black Ink Pad


__________________________________


A little info about commenting here on my blog....


A quick note about comments! My comments are moderated because, unfortunately, I get a TON of spam—the kind telling me about cholesterol medication and all sorts of other weird bot things. 😂 So, if you leave a comment and don’t see it right away, don’t worry! I’ll see it and get it posted for you.

The other issue seems to be whether or not you need a Google account to comment. I have my settings set to “Anyone,” so technically you should be able to leave a comment using any type of login…but Blogger is a pain.

If you’re having trouble leaving a comment, or you’re not sure whether your name is showing up with your comment, please do me one little favor:

Add your name and email address to the end of your comment.

That way, if your comment is chosen as a winner, we’ll know exactly who you are and how to reach you!

I’m sorry for the extra hassle. I’ve Googled, changed settings, switched things around, and tried all the things. I have no idea why it doesn’t work the way it should.

But, again…

Blogger is a pain. 😂

 __________________________________


FIND ME OVER ON:


Instagram: Laurie Willison (@laurie_willison)


All products in today's post are linked below and throughout the post.  These are my personal affiliate links which you can shop from at no cost to you!  :)  Thank you for supporting Soapbox Creations!
The Greetery - District Twelve15 Shop Hop Week 1


We’re doing things a little differently for this release, and we think you’re going to love it! Instead of releasing the entire collection all at once, we’ll be breaking it into smaller, bite-sized product suites released weekly. Think of it as a fun little “shop hop” through District Twelve25! Each week, we’ll stop at a new themed “shop” and introduce a fresh collection of coordinating products, giving you plenty of time to enjoy all of the details and inspiration along the way. The fun begins in mid-October and continues through mid-November, with a brand-new product suite to discover each week. We can’t wait to take you along as we make our way through District Twelve25, one charming shop at a time!  


__________________________________

Here are 2 projects using today's new products! Everything is linked here and below in case you would like to take a closer look!


For my first card, I had so much fun creating a little sampler of quilt blocks using the Quilt Block Builder Stamp Set. I stamped several different designs in my four main colors, mixing and matching the patterns to give each block its own personality. I added in a soft neutral here and there to keep everything light and bright. After trimming each block into a square, I popped them up with foam tape on a white card base, leaving an open space in the center for the “merry CHRISTMAS” from Simple Holiday Sentiments Stamp Set. I love how this one looks like a collection of tiny handmade Christmas quilts!

District Twelve25 - 2026 Holiday Collection Day 1

For my second card, I used the Capsule Quilt Shop Embossing Folder to create that gorgeous dimensional quilt design. I used the same deep blue-green, eucalyptus, sorbet, and brick red color palette, along with plenty of white to really make those colors pop. The embossed texture adds so much detail to the individual quilt pieces and gives the entire design that wonderful fabric-like look.

District Twelve25 - 2026 Holiday Collection Day 1

Once the quilt design was finished, I die cut it and popped it up on a clean white panel. I layered that onto a eucalyptus card base, which tied in perfectly with the green in the quilt. For the sentiment, I used the Simple Everyday Sentiments Stamp Set, stamping “a note to say HELLO” in the same deep blue-green. I placed it right across the center of the quilt design so it would stand out without covering up too much of that pretty pattern.

I love how differently these two cards turned out even though they share the same quilt theme and color palette. The first has a fun sampler feel, while the second really lets one larger quilt pattern take center stage. And I think this color combination might be one of my new favorites!


Shop The Greetery Holiday 2026 Collection

__________________________________


GREETERY SUPPLY LIST:

STAMPS & DIES

Quilt Block Builder Stamp Set

Simple Everyday Sentiments Stamp Set

Capsule Quilt Shop Die

EMBOSSING & STENCILING

Capsule Quilt Shop Embossing Folder

Capsule Quilt Shop Stencil

INKS USED

Rainforest Ink Pad

Eucalyptus Ink Pad

Sorbet Ink Pad

Brickyard Ink Pad

__________________________________


GIVEAWAY

The Greetery is generously giving away TWO Noel Needleworks Bundles! For your chance to win, simply leave a comment on this blog and all the blogs in the list below! Be sure to get your comments in by Wednesday, October 14, at 11:59 PM EDT. 

Winners will be announced on The Greetery blog by 9 AM EDT on Thursday, October 15. 

Good luck, friends!


A little info about commenting here on my blog....


A quick note about comments! My comments are moderated because, unfortunately, I get a TON of spam—the kind telling me about cholesterol medication and all sorts of other weird bot things. 😂 So, if you leave a comment and don’t see it right away, don’t worry! I’ll see it and get it posted for you.

The other issue seems to be whether or not you need a Google account to comment. I have my settings set to “Anyone,” so technically you should be able to leave a comment using any type of login…but Blogger is a pain.

If you’re having trouble leaving a comment, or you’re not sure whether your name is showing up with your comment, please do me one little favor:

Add your name and email address to the end of your comment.

That way, if your comment is chosen as a winner, we’ll know exactly who you are and how to reach you!

I’m sorry for the extra hassle. I’ve Googled, changed settings, switched things around, and tried all the things. I have no idea why it doesn’t work the way it should.

But, again…

Blogger is a pain. 😂

 __________________________________


FIND ME OVER ON:


Instagram: Laurie Willison (@laurie_willison)


All products in today's post are linked below and throughout the post.  These are my personal affiliate links which you can shop from at no cost to you!  :)  Thank you for supporting Soapbox Creations!

10/13/26

Concord and 9th Guest! {Finch Friends}


 Hello, friends! Today I'm sharing a sweet and cheerful card featuring the adorable Finch Friends Stamp Set and coordinating Finch Friends Dies from Concord & 9th! I just love these little birds perched among the pretty flowers and greenery. This set is so much fun to play with, especially when mixing and matching all those gorgeous Concord & 9th ink colors!

I started by creating a soft minty background using Sea Glass Ink. I love how this fresh, pretty color makes the stamped images stand out! Next, I stamped my little finches using Rainforest Ink, giving them that beautiful deep green color. The little details on the birds add so much personality!

Concord and 9th October 2026 Release


For the branches and leaves, I used a combination of Avocado and Pistachio inks. These two greens work so beautifully together and give the greenery a little extra interest. I added the flowers in Watermelon and Buttercup for those fun pops of color. I just love this combination of soft greens with the cheerful peachy pink and yellow blooms!

After stamping and die-cutting all my pieces, I arranged the birds and branches around the edges of my Sea Glass panel, leaving plenty of room in the center for the sweet "wishing you a lovely day" sentiment. I layered some of the images with foam adhesive to add dimension and let a few of the branches extend beyond the edges of the panel. It's such a simple way to add a little extra interest to a card!

To finish everything off, I added the panel to a soft gray card base and scattered a few clear enamel dots around the design. I love how those tiny embellishments tie everything together without taking away from the pretty stamped images.

This card was so much fun to create, and I think it would be perfect for a birthday, a thinking-of-you card, or just sending a little happy mail to brighten someone's day!

Thanks so much for stopping by today! I hope this inspires you to pull out your favorite Concord & 9th inks and create something colorful!


Concord & 9th Supplies

Stamps & Dies

Ink Colors

__________________________________


A little info about commenting here on my blog....


A quick note about comments! My comments are moderated because, unfortunately, I get a TON of spam—the kind telling me about cholesterol medication and all sorts of other weird bot things. 😂 So, if you leave a comment and don’t see it right away, don’t worry! I’ll see it and get it posted for you.

The other issue seems to be whether or not you need a Google account to comment. I have my settings set to “Anyone,” so technically you should be able to leave a comment using any type of login…but Blogger is a pain.

If you’re having trouble leaving a comment, or you’re not sure whether your name is showing up with your comment, please do me one little favor:

Add your name and email address to the end of your comment.

That way, if your comment is chosen as a winner, we’ll know exactly who you are and how to reach you!

I’m sorry for the extra hassle. I’ve Googled, changed settings, switched things around, and tried all the things. I have no idea why it doesn’t work the way it should.

But, again…

Blogger is a pain. 😂

 __________________________________


FIND ME OVER ON:


Instagram: Laurie Willison (@laurie_willison)


All products in today's post are linked below and throughout the post.  These are my personal affiliate links which you can shop from at no cost to you!  :)  Thank you for supporting Soapbox Creations!

9/08/26

The Greetery - The Autumn Edit Collection Day 2


__________________________________


For today's first card, here are the supplies I used:


For this card, I started with a dark charcoal card base and used the A2 Arches Die Set to create a white cardstock arch for the background. I love how the crisp white pops against the dark card base and gives the florals the perfect backdrop.

Next, I used the Wildwood Bouquet Die to create all of those gorgeous flowers and greenery. I die cut the pieces in shades of coral, soft pink, turquoise, gray, and charcoal, then layered and arranged them over the arch. I popped up some of the flowers for extra dimension and tucked the different leaves and sprigs around them to fill out the bouquet. I especially love that big coral bloom!

To finish the card, I stamped the “Thankful for you” sentiment from the Simple Autumn Mini Sentiments Stamp Set in the lower corner of the white arch. I love the combination of the bright florals with all of those soft grays and the dark card base—such a fun color combination for fall!


The Greetery - The Autumn Edit Release

__________________________________


On the 2nd card for today's showcase I used:


For this card, I kept things light and bright with lots of white and just a few pops of those pretty fall colors. I started by using the Herringbone Parquet Die on the white cardstock panel to add some subtle texture to the background. Then I used the A2 Arches Die Set to cut the large arch opening. I love how much interest those two dies add while still keeping the background nice and clean.

Next, I used the Hand-Picked Harvest Stencil to create all of those adorable pumpkins, gourds, and vines in shades of orange, yellow, and green. I used the coordinating Hand-Picked Harvest Embossing Folder to add some extra detail and dimension, then cut everything out with the Hand-Picked Harvest Die. I arranged the pieces along the bottom and side of the arch, popping some of them up for a little extra dimension.

I stamped the “hello, PUMPKIN” sentiment from the Simple Autumn Sentiments Stamp Set inside the arch in green ink. A few clear droplets scattered around the background were the perfect finishing touch. I love how fresh and clean this one feels while still having all those fun fall pumpkins and gourds!


The Greetery - The Autumn Edit Release

__________________________________


This one was so much fun to put together! I started with the Curio: Divider & Details Die to create all of those little compartments. I cut the divider from dark charcoal cardstock and layered it over a soft gray background. Each little section became the perfect spot for its own spooky Halloween scene!

I pulled out the Market Place Eerie Avenue Die and filled the compartments with all sorts of fun Halloween details—ghosts, pumpkins, spiderwebs, stars, a spooky tree, and even that tiny fence. I kept the colors mostly neutral with black, gray, and cream, then added pops of orange and yellow along with a little sparkle here and there. I love how the Curio divider turns all of those tiny die cuts into their own little Halloween vignettes. The Curio collection was designed for creating these miniature collages, so it was perfect for this card.

To finish it off, I stamped the “BOO! for you” sentiment from the Hey Honeycomb Halloween Stamp Set in one of the bottom compartments. There are so many fun little details to look at on this card, and I love how they all came together for a spooky—but still pretty cute—Halloween card!


The Greetery - The Autumn Edit Release

 __________________________________


Click HERE to see the full release on Wednesday, September 9th!

Check out these talented ladies to see more!


GIVEAWAY:

  • Two $100 gift cards
  • Comment on each blog along the way for more chances to win!
  • Comment deadline is Tuesday night, 9/8 at 11:59 pm EDT. Winners announced on The Greetery blog by 9 am EDT on Wednesday, 9/9

__________________________________


A little info about commenting here on my blog....


A quick note about comments! My comments are moderated because, unfortunately, I get a TON of spam—the kind telling me about cholesterol medication and all sorts of other weird bot things. 😂 So, if you leave a comment and don’t see it right away, don’t worry! I’ll see it and get it posted for you.

The other issue seems to be whether or not you need a Google account to comment. I have my settings set to “Anyone,” so technically you should be able to leave a comment using any type of login…but Blogger is a pain.

If you’re having trouble leaving a comment, or you’re not sure whether your name is showing up with your comment, please do me one little favor:

Add your name and email address to the end of your comment.

That way, if your comment is chosen as a winner, we’ll know exactly who you are and how to reach you!

I’m sorry for the extra hassle. I’ve Googled, changed settings, switched things around, and tried all the things. I have no idea why it doesn’t work the way it should.

But, again…

Blogger is a pain. 😂

 __________________________________


FIND ME OVER ON:


Instagram: Laurie Willison (@laurie_willison)


All products in today's post are linked below and throughout the post.  These are my personal affiliate links which you can shop from at no cost to you!  :)  Thank you for supporting Soapbox Creations!

 
BLOG TEMPLATE BY DESIGNER BLOGS