10/29/16

Are you YETI?

Did you know there are something like 9 Fridays left till Christmas?  WHAT?  I am in just as much shock as you!  I have a Christmas card appropriate for the occasion!

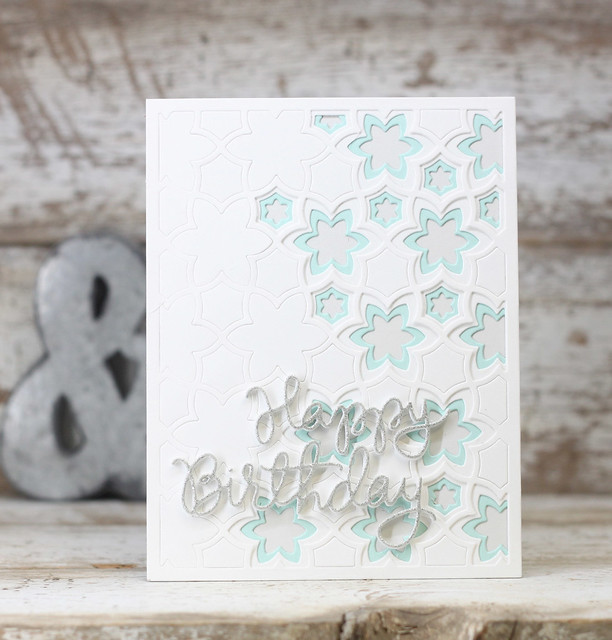
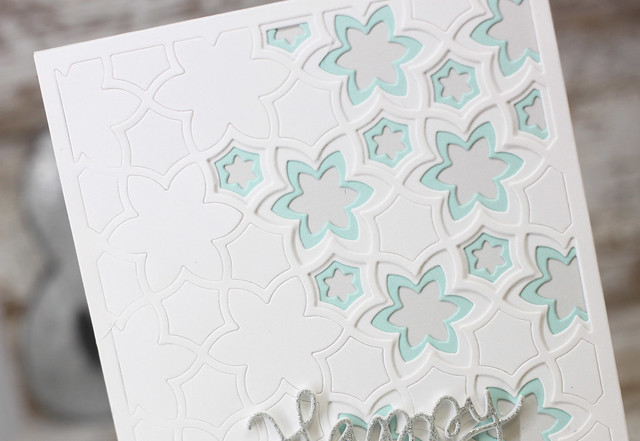
I don't ever make a card without a sentiment but for some reason, I thought it worked for this card...

October 2016 MFT

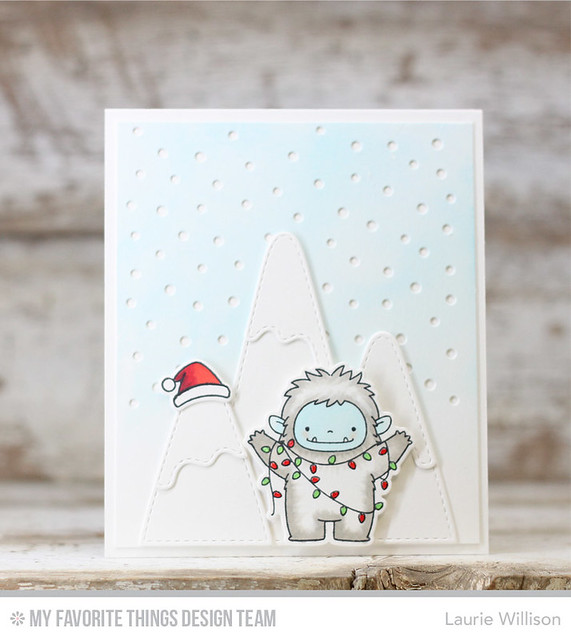
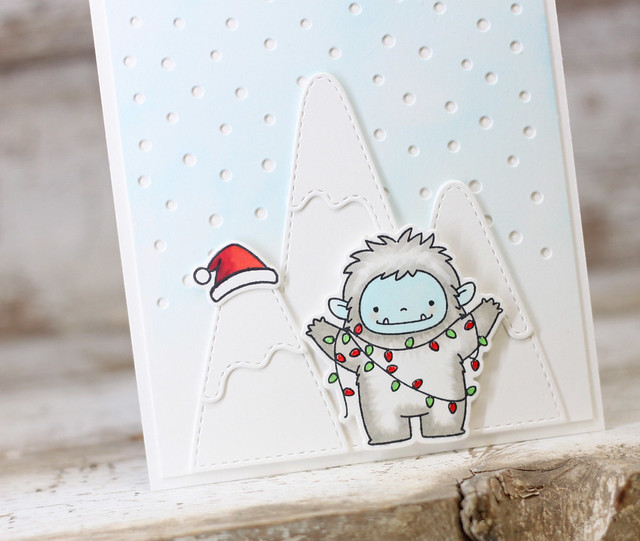
I really had so much fun making this card.  For the background, I did some ink blending with Tumbled Glass.  Next, I took the Snowfall die and die cut the background panel.  Next, I die cut the mountains out of white and added those in.  I colored the little Yeti with Copics and then dotted the Christmas lights with some Glossy Accents.  I decided to add in the Santa hat at the last minute and thought it would be fun to sit on the mountain top instead of his head.  

October 2016 MFT

I added the sentiment inside the card....

Untitled

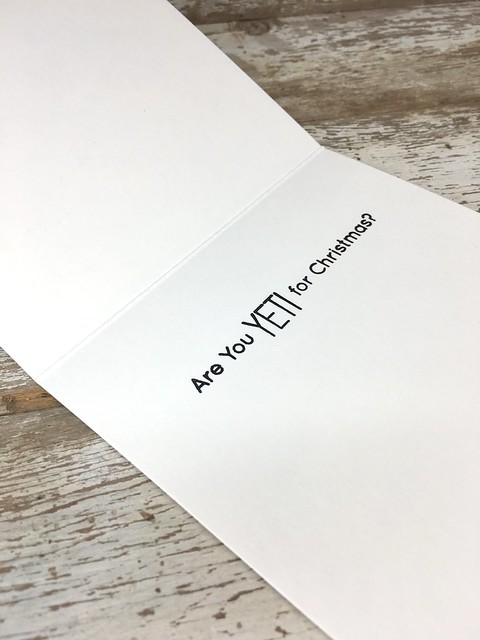
I thought it made it a fun surprise message on the inside of the card.  I hope you like my Yeti card.  There is a new release underway over at MFT.  Head on over to their blog to see the new sneaks!

Thanks for stopping in!

Laurie

~~~~~~~~~~~~~~~~~~~~~~~

Supply List: 

10/28/16

I like how you roll...


I had to try my hand at an interactive card.  So when I saw this  hedge hog set, I knew he would be perfect for a spin...

Print

First, I watercolored a background so I would have sky and some great.  then I pulled out the Copics and tried my best at some coloring.  

IMG_3667

I popped up the log and mushrooms with foam tape and then added in the interactive element.  So easy!

IMG_3669

Head on over to MFT to see all their interactive goodies.   Have a great day!

Laurie

~~~~~~~~~~~~~~~~~~~~~~~

Supply List:


10/27/16

hello...

Hey there, crafty friends!  I am stopping in today with a card using a set from Right at Home called Grateful Heart.  I love the images and font in this set.  I used just 2 stamps for this card and I love the way it turned out...

Untitled

First, I stamped the leaf image on some pattered paper.  I love how the leaves feel like they are actually falling.  I die cut the paper with a stitched square die and then popped it up on foam tape.

Untitled

Last, I stamped the sentiment on the bottom...

Untitled

That is all I have for today.  Thanks for stopping in!

Laurie

10/24/16

MFT Creative Construction...

It's time for another round of Creative Constructions with Blueprints over at MFT.  If you don't know what Blueprints are,  they are the most amazing die sets that include lots of fun details to create cards or tags.  Several of the sets include sentiments, as well.  Here is our challenge for today...

A simple die-cut word can serve as a stand-alone sentiment or accent, or be integrated into a full on greeting when paired with the perfect stamps. Many of our Blueprints include simple word elements that speak volumes and this month, we’re sharing ideas for integrating them into your own crafting.

I have a set of super simple tags today using Tag Builder: Blueprints 6.

Print

These tags are very easy to make with just a few supplies....

white cardstock
red ribbon
twine

IMG_3762

To make them even easier, I cut out the "xoxoxo" out with white cardstock and then colored them in with Copics....

Untitled

To keep them uniformly spaced, I used Press n Seal...of course!

Untitled

Untitled

Then I added in a little liquid glue and attached them all at once to the tag....

Untitled

All ready for some Valentines Day treats!

IMG_3765

Head on over to the MFT Blog to see what the other girls have constructed for today!  :)  Thanks for stopping in!

Laurie

Moments Inked Newsletter...

If you follow my blog, you know I have said time and time again....I love making lists.  I always have several lists going at one time and over the years have used a bullet system for my lists.  I love to be organized and love the feeling of checking things off the list.  

I have seen the use of Bullet Journals over the years, but have been a little intimidated because of all the beautiful ways people add in hand drawings and hand lettering.  I saw my friend Linda's journal this last weekend and she inspired me to try.  So today's post is for all the bullet journaling newbies (or wannabe's like me!)  The great thing is, with all the Monthly Moments stamps and dies, bullet journaling can be even easier!

All you need for your Moments Inked binders is THIS adorable graph paper to get started, along with your favorite pen!

This first page is a to do list using stamps from the Posted Stamp Set.

Moments Inked....beginner bullet journaling

I used a sharpie pen and added in the check boxes with a ruler and another arrow stamp from the Posted Stamp set, as well.

This next page was a super simple goal page.  I used the Monthly Moments: Year Round dies to create the title on this page and then added in some more check boxes and a list....

Moments Inked....beginner bullet journaling

If you search "Buller Journal" on Pinterest, you will find lots of posts on how to add hand drawn details to your journals.  I had to give this gratitude banner a shot....

Moments Inked....beginner bullet journaling

Last, I added in an actual week layout.  This was super simple to draw up and of course, as I keep learning, I am finding more and more ways to decorate these pages.  

Moments Inked....beginner bullet journaling

Moments Inked....beginner bullet journaling

Click HERE to head over to Pinterest to see all kinds of resources to start your own bullet journal.  And don't forget to to head on over to Papertrey Ink and check out the whole Monthly Moments Planner line.  So glad you stopped in today!  Hopefully I helped out a bullet journal newbie take the next step!  Have a great day!

10/22/16

A card for no reason....

It has been a LONG time since I sat down and made a card for no reason.  Nothing due, no deadline, just a card!  This last weekend I was lucky enough to host a craft weekend with Amy Kolling and we had 15 ladies come down from all over the US and even 2 from Canada!  It was a great time and they defiantly sparked my craft mojo!  I was lucky enough to borrow these Birch Press cover plates from my sweet friend, Tracy, and I had to cut out several sets.  The first set I cut out did cut out all the way and it landed in the trash pile....but then I looked closer and had to make this....

IMG_3755

The top 2 cuts are white yardstick, then some Aqua Mist and the card base is Soft Stone, all from PTI.  

IMG_3756

I used this sentiment from Simon Says and cut it out with some foam tape too, for dimension.

IMG_3757

The detail in these dies and how they looked stacked up, is amazing!  

IMG_3759

A big thank you to Tracey, for letting me use these plates....now I need to add them to my Christmas list! :)

Thanks so much for stopping in today!  Hope you have a great weekend!

Laurie

~~~~~~~~~~~~~~~~~~~~~~~~~~~


Supply List:


BLOG TEMPLATE BY DESIGNER BLOGS